Trek Grade
Easy - Moderate
Highest Altitude
14,000 ft
Base Camp
Manali
Best Time
May, June, July & Sept
Not sure which trek is right for you? Trekup India’s Mountain Experts have you covered.
Not sure which trek is right for you? Trekup India’s Mountain Experts have you covered. From figuring out if a trek matches your fitness level to knowing who you’ll be trekking with, we’re here to answer all your questions. Reach out to our Mountain Experts and plan your trek with confidence.
Bhrigu Lake Trek
The Bhrigu Lake Trek is an excellent option for beginners who wish to experience the awe-inspiring beauty of nature. This trek takes you to a beautiful valley in the Kullu region, where you can discover some of the most stunning campsites and breathtaking views.
The trail stretches for approximately 10km, winds through slick and scree boulders towards an alpine lake named Sage Bhrigu. The lake’s altitude is around 14000 feet, surrounded by lush grass and alpine plants, offering an excellent opportunity to appreciate nature’s beauty. However, it is not recommended to camp near the lake.
The trek’s highest point is 14,009 feet, and it is open all year round. However, the best time to trek is in the middle of May or June when the weather is excellent and the mountainside changes to brown, green, and white. The ridge is steep, but the descent is easy, making it a perfect trek for beginners.
The panoramic views from Seven Sister Peaks or Hanuman Tibba are fantastic. You can witness Deo Tibba, the outstretched Pir Panjal ranges, the lush lines of cedar and oak forests, stunning meadows with lush greenery, the enthralling carpeted alpine floors, and the rivers that flow through the trails. The region’s scenic views are breathtaking, making the trekking experience awe-inspiring. If you’re lucky, you may spot Himalayan Monal, Snow Cocks, and gorgeous birds of prey.
The views from Rola Kholi camp are stunning, and the entire trek is a fantastic journey. Therefore, if you want to explore the natural beauty of the Himalayan landscape, the Bhrigu Lake Trek is a perfect choice.
Trek Cost
- Stay will be on a twin-sharing basis in tents
- + 210 Trek Insurance (Mandatory)
- Discount Policy
Pickup time 11.30 A.M from Hotel Kundan Inn, Aleo, Naggar Road, New Manali, Distt. Kullu (H.P.).
Fix Departure Dates
Bhrigu Lake Trek Videos
Videos by experts watch these videos to prepare well for a Successful Trek

Want To Trek Like Pro?
Basically, watch these videos if you want to trek the same way professional trekkers do and make your skills better. These videos contain useful tips and techniques to further improve your trekking skills itself. These videos actually help both new and experienced trekkers improve their trekking skills. These videos definitely provide useful tips that make your trek better. We are seeing that these videos by Trekup India experts will only help you make your trekking skills better.


Know Everything About Acute Mountain Sickness
Acute Mountain Sickness occurs when people trek to high altitudes above 8,000 feet. This condition itself develops further due to reduced oxygen levels at such heights. Basically, as you go higher up, the air pressure and oxygen levels decrease, which causes the same problem. Acute Mountain Sickness surely causes headache, nausea, vomiting, and dizziness in affected persons. Moreover, peoples also experience difficulty in sleeping during this condition. To avoid mountain sickness, you should actually trek up slowly to higher altitudes. To learn further about this condition itself, watch the videos by Trekup India.


Day Wise Detailed Itinerary of Bhrigu Lake Trek
Day 1: The drive starts To Gulaba from Manali and then trek to Rola Kholi - 5kms
- Gulaba is a region situated in the Indian state of Himachal Pradesh
- It is an ideal destination for nature lovers and adventure enthusiasts
- The altitude of this region ranges from 10,370 feet (3,161 meters)
- The total trek time taken to reach here is 1 hours of driving
- The trek to Rola Kholi covers an altitude range of 12,566 feet and takes 4 hours to cover a distance of 5.1 km. which includes some steep ascents.
- The final part of the trek is an undulating path that offers a great opportunity to rest your legs and take some photographs.
- Once you arrive at Rola Khuli, you will be able to view Mount Hanuman Tibba and its nearby mountain ranges.
The journey from Manali to Gulaba is a scenic route, offering breathtaking views of thick pine forests and apple orchards. During winter, the entire landscape is covered in snow, creating a magical and surreal atmosphere. The area is also renowned for its art galleries and studios, making it a popular destination for art enthusiasts.
To reach Gulaba from Manali, you need to take the road leading to the Gulaba Tourist spot in Kullu. The road may be steep and winding, taking around 1.2 hours of driving. It is advisable to begin your journey early in the day to avoid traffic.
The distance between Manali and Gulaba is approximately 21 km. Depending on the weather and traffic conditions, the journey may take around 1 hour and 20 minutes.
To reach Jonker Thatch, you need to start your journey from the village of Gulaba, located 24 km from Manali. You will walk through the clear waters of Bhrigu Lake, then through apple and pine orchards, experiencing stunning panoramic views of the mountain ranges and vast meadows. You may also encounter wild horses and grazing sheep in the nearby fields.
The trek starts at the Gulaba checkpoint thick forest and passes through open grasslands and dense forests before reaching the highest point of the trail at Rola Kholi. The hike begins at an altitude of 12,500 feet and covers a distance of 6 km within 3-4 hours.
The trek route is going to be steep and strenuous, so it is advisable to carry 2 litres of water and a few snacks to help you relax between the demanding laps. For the first couple of miles, you will walk through a forest, taking a bath under the shade of rustling conifers. You can spot cedar, oaks, and birches, and it is stunning to see a glimpse of blue through the leaves.
After walking for 20 minutes on the trail, the woods will be drained, revealing rolling green meadows. The shepherds’ area is where cattle grazers are gathered from villages in the summer. You can find some mud huts and camp poles dotted around. Leaving the meadow in place, you move towards the south, and the summit in the form of Hanuman Tibba is rising in sharp focus right now, and a bit below it, you will see the Seven Sisters Peaks. Below, you will find the green area in the Beas Kund Valley.
The next step is a small vegetation cover before the path drops down to the rocky meadows. The adrenaline peaks when the trail becomes narrower and steeper before entering the fields that make up Rola Kholi. Around 15 or 20 minutes away from our campsite, we travel through two nallahs or small streams that serve as one of our water sources. Our camp is situated close to Chor Nallah, located at the Rola Kholi campsite.
Day 2: Trek From Rola Kholi to Bhrigu Lake and back to Rola Kholi
- The trek from Rola Kholi to Bhrigu Lake is undoubtedly a difficult one, covering a distance of over 10 kilometers and taking anywhere from 5.3 to 7 hours to complete.
- The altitude reaches a staggering 14,000 feet, so it is not for the faint of heart.
- However, those who make the journey are rewarded with some of the most stunning views and breathtaking landscapes in the world.
The trail is steep and rocky, and it can be quite challenging to navigate. However, the panoramic views of the surrounding mountains, including the snow-covered summit of Indrasen, Deo Tibba, and Hanuman Tibba, make it well worth the effort. It is best to start the trek early in the morning since it is a long distance to cover, and you’ll want to have plenty of time to enjoy the scenery.
To reach Bhrigu Lake, you’ll need to climb about 1,348 feet, starting with trekking up the first ridge, which is about an hour’s walk away. If you’re lucky enough to visit in June, the trail is typically covered with snow, which can be quite a challenge to navigate. However, as the snow melts, the landscape gradually changes from green to white and brown.
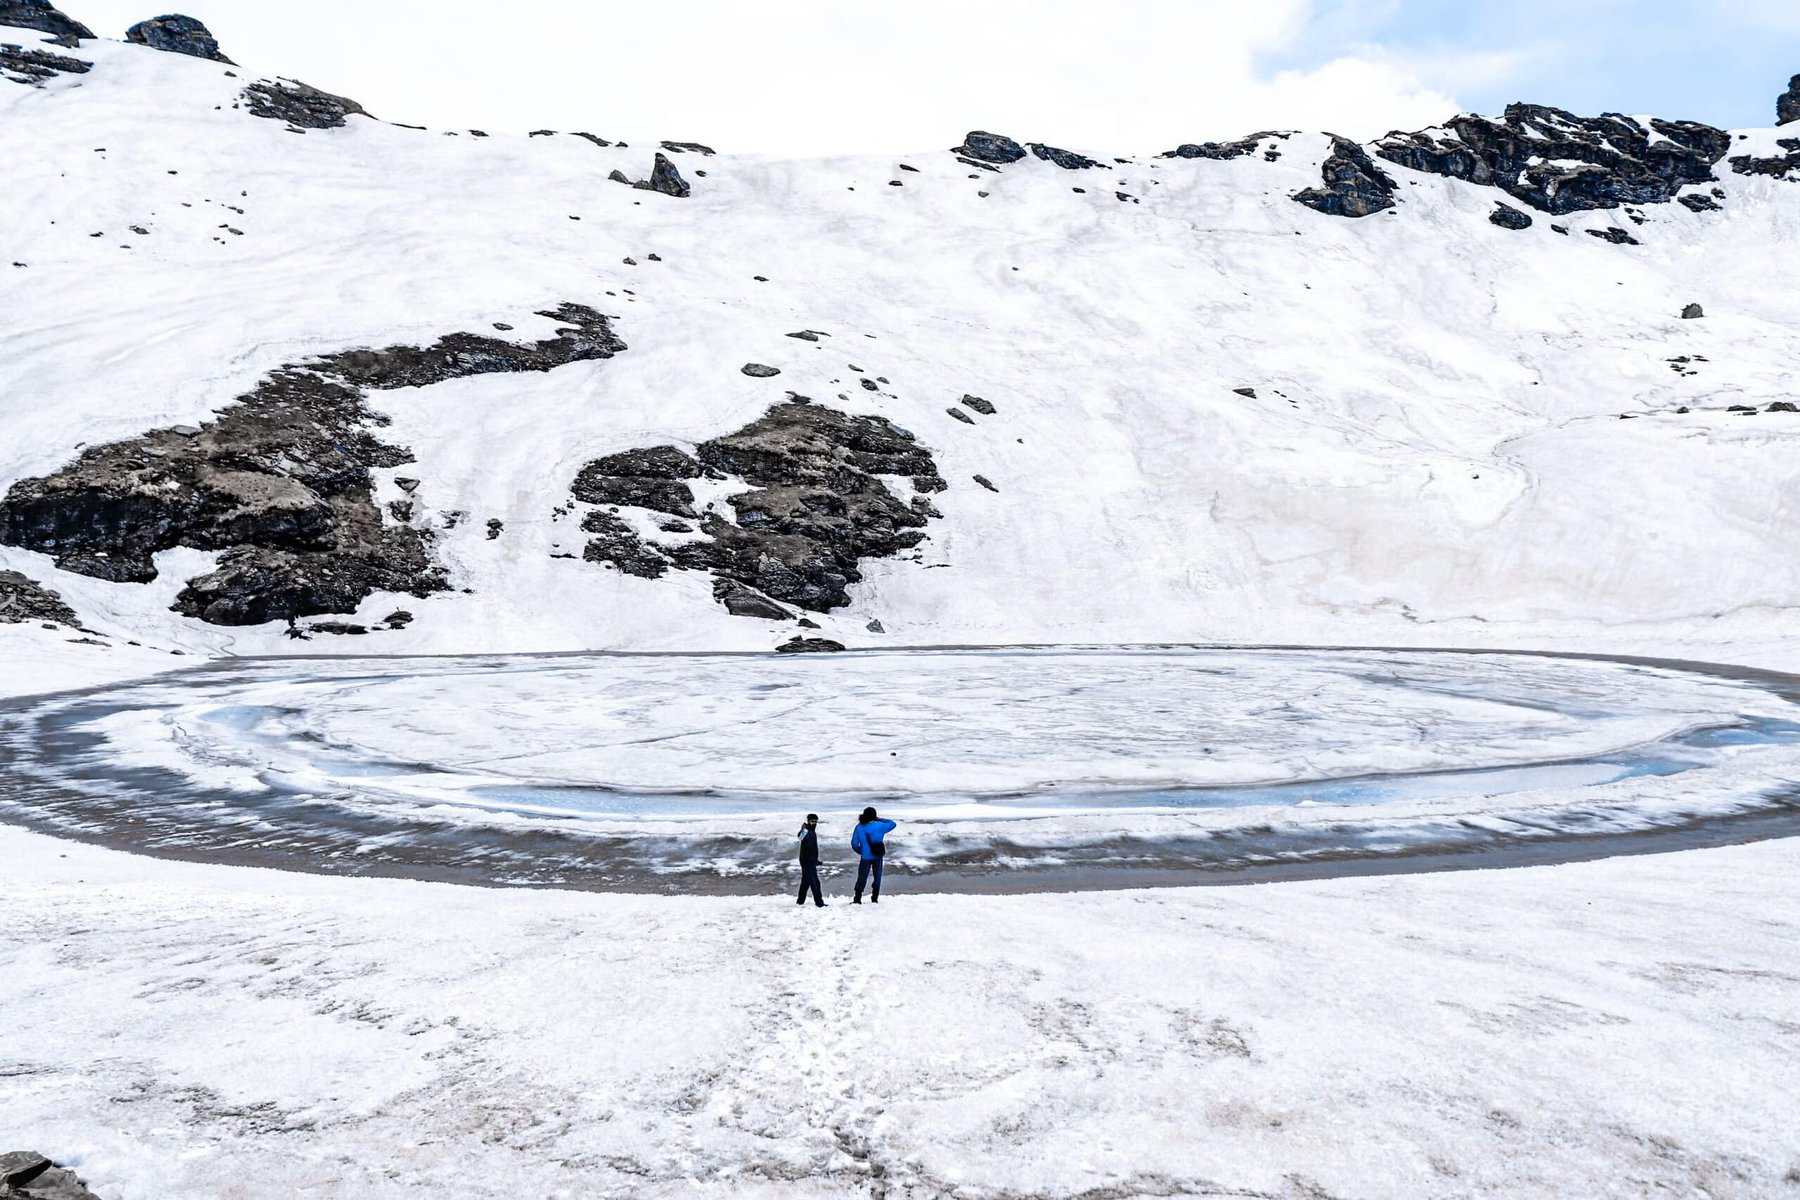
As you climb the ridge, you’ll see an oval-shaped glacial lake on your left. Depending on the time of year, the lake can be completely covered by snow or surrounded by grass and alpine plants. If you’re fortunate enough to have a clear day, you’ll be treated to an excellent panoramic view of Pir Pinjal and the Dhauladhar mountain ranges. You’ll also be able to see majestic peaks like Indrasen, Deo Tibba, and Hanuman Tibba.
However, the lake is often covered by fog, which can make it challenging to find the right route. Therefore, it’s highly recommended to hire an experienced local guide who can help you navigate the trail safely. After spending time at the lake, you can retrace your steps back towards Rola Kholi, taking in the stunning scenery one last time before you return home.
Day 3: Trek From Rola Kholi to Gulaba and Drive back to Manali ( drive distance - 13kms )
- The trekking path we will follow today will take us through a wide range of altitudes, beginning from 10,370 feet (3,161 m) and gradually descending to lower elevations.
- Our total trek time will be approximately 3-4 hours.
- During the trek, we will cover a distance of 5 km.
Today’s trek will see us retracing our steps back on the same route that we took earlier, through the picturesque green meadows that we passed on the way to Gulaba. This stretch of the trek will be a long one, taking us approximately 2-3 hours to complete.
Once we reach Gulaba, we will travel back to Manali by car. Our expected arrival time in Manali is between 3 to 4 pm. This trek is sure to be a memorable experience, offering breathtaking views of the stunning Himalayan landscape along the way.
We’ve prepared a comprehensive Trek Route Map for your upcoming adventure to Bhrigu Lake Trek, which outlines the entire journey including all stops and trails. This map provides detailed information on the terrain, distance between points of interest, and estimated travel time to help ensure a safe and enjoyable trek. We’ve carefully curated the map to ensure that you have all the necessary information at your fingertips. Please take a moment to review it thoroughly, and don’t hesitate to reach out if you have any questions or concerns.

The Trek Altitude Chart is a useful tool for Trekkers to monitor their altitude changes during their rides, allowing them to plan their routes more efficiently and track their progress over time. This Bhrigu Lake Trek chart is beneficial for both casual and experienced Trekkers, helping them make the most out of their Trek experience.
Trek Cost Inclusions
- Stay: 2 Nights of tented accommodation at individual campsites of Trekup India on twin sharing.
- Meals: Trekup India will provide freshly cooked meals during the trek starting with Lunch on Day 1 to tea, coffee & breakfast on day 3 (Meals are simple, nutritious, and vegetarian)
- Transport : From Manali to Manali.
- Trek Insurance Mandatory: (Trekup India recommends each trekker to get insurance) you can read more about What Is Trek Insurance, Why It Is Mandatory On Treks And What It Covers .
- Trek Equipment: Sleeping bag, Sleeping tents, Kitchen tent, Dining tent, Toilet Tent.
- Amenities: All utensils, sleeping mattresses (Black foam mats), Crampons, and Gaiters for snow.
- Health & Safety: First Aid Box, Oxygen Cylinders, Stretchers, Oxi meters, BP Machines, health.
- Permits: Forest Permits and Camping Permission Fee
- Trek Crew: High Altitude Chef, Helpers, Trek Leader & Guides, and other support teams.
- Potters & Mules: Potters and Mules are to carry all trekking equipment, ration, and vegetables.
Trek Cost Exclusions
- GST 5% (it is Mandatory)
- Any Meals/accommodation beside the itinerary or not mentioned in the program.
- Any Bus / Airfare to/from trek start/end point
- Personal Medical expenses do carry your medication.
- Any personal services such as Laundry, phone calls, liquors, mineral water, etc.
- Any still / video camera fee
- Any Entrance fee Monuments, Monasteries, Museums, Temples – Pay directly on the spot.
- Mules or porter charges to carry private baggage (Offload Charges for bag 400 per day, per bag if paid online (at base camp 1,600). Note: Bag weight should not be more than 10 kg.
- Any emergency evacuation charges
- Any services that are not mentioned in the cost inclusion section.
What should you pack for the Bhrigu Lake Trek
Bhrigu Lake Trek is a high-altitude trek. The trekking gear you have to have for this particular trek differs from normal treks. Thus, read this whole segment. There is an important question that the trekker who is doing trek asks, like what all things to carry while trekking. Below, we have provided the details on everything you should take; an easy way to remember is by Head to foot or foot to head. We have prepared from Head to foot.

Head Gears
When trekking it's important to carry headgear to protect your head and face.
Heading out for a Bhrigu Lake Trek? Don’t forget to carry headgear to protect your beautiful face and head from the sun, wind, and dust! It’s an essential accessory that keeps you safe and comfortable throughout your adventurous journey. So, make sure you pack it before you step out into nature!
- Head Lamps are essential for the night, and most importantly, headtorchs keep your hands free while trekking.
- Hats or Cap– Cap will protect you from winds and sometimes freezing temperatures for the night. Hats protect you from the sun during the day and also ensure they have a strap so the hat doesn’t blow from the wind.
- Sunglasses– you will need specific sunglasses for trekking. The glasses should protect from UV rays, fit your face perfectly so it doesn’t fall while you climb, jump, or cross an obstacle, and be according to the weather conditions of the place; the glass should be made to fit different weather conditions.
- Buff / Balaclava– You must carry this to protect your mouth or neck from extreme temperatures and keep it warm.
Clothes
When trekking in high altitudes, prepare for cold weather by wearing layers. Layering traps heat, keeps you warm, and allows you to easily adjust your clothing as temperatures fluctuate.
Layering is important for different seasons when trekking. When planning a high-altitude trek, it is important to prepare for the cold weather. Wearing layers is the best approach as it provides both protection and flexibility when the weather changes frequently in the mountains. Layering helps to trap heat and keep your body warm, while at the same time allowing you to easily adjust your clothing as the temperature fluctuates. By wearing layers, you can enjoy your trek comfortably and stay safe in the unpredictable mountain weather
- For spring, summer, and monsoon treks, consider wearing three layers: a woollen sweater, a fleece, and a padded jacket.
- For autumn treks, add one more fleece layer to make it four layers.
- For winter treks, you may need five layers with thermals, a woollen sweater, two fleeces, and a padded jacket.
- T-shirt/sleeve shirt– Bring three T-shirts and two quick-dry trek pants, wearing one and carrying the others. Long sleeve shirts help to protect from sun UV rays. We recommend synthetic T-shirts as they get dry quickly when they get wet.
- Hiking / Trekking Jacket– down jackets (-5 to-10 C) or two-three-layer jackets.
- Thermals– at least two pairs of thermals help keep the body warm during cold weather.
- Undergarments– you can carry them according to your habitual and hygiene requirements.
- Gloves– 1 pair of gloves will keep your hand warm and nice.
- Trek Pants– Bring 2 to 3 comfortable trekking pants. Trekking pants play a significant role, as they are designed for comfort and mobility, making trekking easier. It should be Synthetic so that it gets dry quickly when wet.
- Rain Wear– you can carry a raincoat or Poncho. During long rains and snowfalls, the waterproof jackets start leaking. Still, the Poncho and raincoats keep you dry, so choose accordingly.
Tip: If you choose a raincoat on your trek, carry a small waterproof cover so things inside your backpack can’t get wet. If you carry a Poncho, you don’t need to worry. It protects both you and your backpack.
Foot Gears
When it comes to planning a trek, one of the most important aspects is to ensure that you have the right kind of foot gear.
- Trekking shoes whichare waterproof and have ankle support. Walking / Hiking sandals which can be used off the trek, i.e., in the morning and evening hours when you reach the campsite, basically to get your feet rest from heavy boots, sometimes used for crossing streams and rivers, it’s more comfortable and safer than crossing barefoot or wetting your shoes. Sneakers (Optional) can be worn for normal driving days or used around the camp.
- Socks– you should at least carry 3 to 4 pairs.
- Microspikes & Gaitorswill be provided by Trekup India when required. You don’t have to carry them.
Personal First Aid Kit
Don't forget to pack your personal first aid kit! It's always better to be safe. So, make sure you're prepared for any unforeseen circumstances.
Below are some common medicines generally required/used during your adventure trip; however, please consult your doctors prior.
- Antiseptic towel or water syringe (to clean the wound)
- Butterfly bandage for a small cut
- Cotton and elastic bandages and sterile gauze pad for larger wounds
- Latex gloves are used when the wound bleeds.
- Medicine for Diarrhea (Upset stomach)
- Medicine for cold, flue/fever, headache
- Some pain killers
- ORS pouches
- Quick pain relief spray (External use)
- Any personal medicine prescribed by your doctor
- Dimox / Similar for high altitude sickness
- Bug Repellent
- Carry some nutria/energy bars and drinks (non-alcoholic)
- Note: Kindly consult your doctor before purchasing or taking any medicine.
Gadgets and Other Items
You might also consider bringing a camera, binoculars, portable charger, and snacks. Be well-prepared and tackle any trail with confidence.
- Trekking Poles
- Mobile phone
- Camera
- Spare batteries for phone and camera, power bank
- Lightweight flashlight or headlight
- A waterproof bag made of plastic is used for the camera.
- Plug/converter for electrical items
- 1-litre water bottle
- A journal with a pen would be a good idea to keep your notes.
- Some book of your interest for the ideal time
- Get into the habit of maintaining a Map and guidebook of the region.
Hygiene & Personal toiletry
Remember to pack hygiene and personal toiletry items such as soap, shampoo, toothbrush, toothpaste, deodorant, and toilet paper.
- Sunscreen with UV protection
- 1 or 2 small quick-drying towels
- Toilet paper/tissues/wet wipes
- Toothbrush/toothpaste/ mouth freshener
- Deodorant / Talcum powder
- Shampoo
- Lip-gloss/salve
- Sanitary pads/tampons (For female trekkers)
- Bio gradable Soap
- Nail clipper
- Your other personal items that you use daily.
Compulsory Documents to Carry
There are certain documents that you should always carry with you. These documents are not only necessary for your safety and security, but they may also be required by local authorities.
These files must be submitted to the Forest Department before your trek. With none of these, you will not be permitted to trek—original and photocopy of government photo identity card. Carry IDs like Aadhaar, voter ID, etc.
How To Plan Your Trek & Reach Manali?
Everyone must get to Manali at the beginning. There are three options to get to Manali.
Option 1:-
Travel overnight on a bus to Manali.
Delhi to Manali 14 hours
Chandigarh to Manali 10 hours
A bus ride to Chandigarh is the most convenient choice.
We always suggest using government buses instead of those operated by private companies outside the bus station. In our experience, we’ve observed that private buses are more likely to be delayed.
Additionally, government buses are more trustworthy. Whatever bus you pick, be sure to get to Manali at the very least between 9 and 10 a.m.
Option 2:-
Fly to Delhi/Chandigarh airport, then travel via bus to Manali (Best alternative).
Fly to Bhuntar Airport. Manali is only two hours away. You can easily catch an airport bus or private taxi to the airport.
We do not recommend Bhuntar airport due to the pricey flight and the unpredictable nature of cancellations. If you decide to fly via Bhuntar, be sure to be there at least a day before the trek begins.
Option 3:-
It is possible to go by train. Pathankot railway station, where you can take bus services that direct you to Manali, which is about 300 kilometres from the station and will require an overnight trip. If you do this, arriving at Manali one day prior is best.
When you arrive at the point of assembly for the trek to Manali, Trekup India will handle your journey up to Jobra, Chatru to Manali and an excursion to Chandratal.
Make sure that you arrive at Manali before 10:30 am on the program’s initial day so you can get to the place of assembly before noon.
Fitness Required & Preparation Guide For Bhrigu Lake Trek
If you’re preparing for a Bhrigu Lake Trek, Trekup India recommends jogging as part of your fitness routine. Jogging helps work out the same muscle groups that you’ll use during trekking and can help you build endurance. You don’t need any special equipment to get started.

Fitness Target
Trekup India has put the Bhrigu Lake Trek into an easy-to-moderate-grade-level trek.
For Easy – Moderate Treks – In order to be well-prepared for your upcoming trek, it is recommended that you focus on building your endurance by aiming to cover a distance of 4.5 kilometers in less than 45 minutes. This will help you to develop the necessary stamina and strength required to successfully complete your journey.
How to Achieve This Fitness Target?
To start preparing for your trek:
- Try jogging for at least five days every week.
- If you find 5 km too difficult at first, begin with 2 km and gradually increase over 2-3 weeks.
- Once you feel more comfortable running 5 km, focus on improving your speed gradually on a daily basis.
It is important to ensure that you can consistently complete 4.5 km in under 40 minutes for at least two weeks before your planned trek. Allow yourself 6-8 weeks to prepare physically for the journey.
Strength Training exercises that benefit Trekking
Trekking is an activity that demands a good level of strength.

Trekking is a demanding activity that requires good cardiovascular endurance, muscular strength, and overall fitness. To help you prepare for your trek, incorporating bodyweight exercises into your training routine can be an effective way to build strength, improve stability, and enhance endurance, all of which are crucial for a successful trek. In this regard, here’s a breakdown of body weight exercises categorized by the specific body parts they target and the benefits they offer during trekking.
1. Lower Body Exercises
Lower body exercises like squats and lunges are great for building lower body strength, essential for trekking.
a. Squats
Squats are an excellent exercise for building lower body strength, essential for trekking. They target the quadriceps, hamstrings, glutes, and calves. Solid quadriceps and glutes provide power for ascending and tackling uphill climbs, while vital hamstrings aid stability during descents. This is particularly helpful in navigating uneven terrain during trekking.
How to perform Squats Exercises:
- Stand with feet shoulder-width apart, toes pointing slightly outward.
- Lower your body by bending your knees and hips, keeping your back straight.
- Lower until your thighs are parallel to the ground or as low as comfortable.
- Push through your heels to return to the starting position.
b. Lunges
Lunges target the quadriceps, hamstrings, glutes, and calves. They improve lower body strength, balance, and stability, crucial for maintaining control on rocky trails and steep slopes. Additionally, they enhance flexibility, reducing the risk of injury while trekking.
How to Perform Lunge Exercises:
- Stand with feet hip-width apart, hands on hips or sides.
- Take a step forward with one foot, lowering your body until both knees are bent at 90-degree angles.
- Push through the heel of your front foot to return to the starting position.
- Repeat on the other side, alternating legs.
2. Upper Body Exercises
Upper body exercises such as push-ups and pull-ups effectively strengthen the upper body, especially the chest and shoulders, which are essential for carrying a backpack during treks.
a. Push-Ups
Targets: Chest, shoulders, triceps, and core.
Benefits for Trekking: Push-ups are an effective exercise to strengthen the upper body, especially the chest and shoulders, essential for carrying a backpack during treks. Improved upper body strength will also help maintain posture and stability while traversing challenging terrain.
How to Perform Push-Ups Exercises:
- Start in a plank position with hands shoulder-width apart and body in a straight line from head to heels.
- Lower your body by bending your elbows until your chest nearly touches the ground.
- Push through your palms to return to the starting position.
- Keep your core engaged throughout the movement.
b. Pull-Ups/Bodyweight Rows:
Targeting the back, biceps, and shoulders can significantly benefit trekking. You can strengthen these muscle groups by performing pull-ups or bodyweight rows and improve your posture and balance while carrying a backpack. Additionally, more muscular back muscles can help reduce the risk of back strain and fatigue during long treks, making your journey safer and more comfortable.
3. Core Exercises
Core exercises like planks and Russian twists can help strengthen the core muscles, which are crucial for maintaining stability and balance while trekking on uneven terrain.
a. Planks
Targets: Abdominals, obliques, and lower back.
Benefits for Trekking: Planks are an effective exercise that helps strengthen the core muscles. These muscles are crucial for maintaining stability and balance while trekking on uneven terrain. A strong core also helps improve posture, reducing the risk of back pain and fatigue during extended hikes.
How to Perform Planks Exercises:
- Start in a plank position with elbows directly under shoulders and body in a straight line from head to heels.
- Engage your core and hold the position, avoiding sagging or arching the back.
- Keep breathing steadily and hold for the desired duration.
b. Russian Twists
Targets: Obliques, abdominals, and lower back.
Benefits for Trekking: Russian twists engage the core muscles, particularly the obliques, improving rotational stability and balance. Enhanced core strength helps prevent injuries and improves overall performance during trekking.
How to Perform Russian Twist Exercises:
- Sit on the ground with knees bent and feet flat, leaning back slightly to engage the core.
- Clasp hands together and twist the torso to one side, bringing the hands towards the ground beside the hip.
- Return to the centre, then twist to the other side.
- Continue alternating sides for the desired number of repetitions.
4. Full Body/Cardiovascular Exercises
Full-body/cardiovascular exercises like burpees and mountain climbers are excellent for improving cardiovascular endurance, strength, and agility.
a.Burpees
Burpees are an excellent full-body exercise that targets your legs, chest, arms, and core. This exercise dramatically benefits trekking enthusiasts, improving cardiovascular endurance, strength, and agility. Regularly incorporating burpees into your workout routine can enhance your overall fitness level, which can help you endure long hikes and rugged terrains with ease.
How to Perform Burpees Exercises:
- Start in a standing position.
- Squat down and place hands on the ground.
- Jump feet back into a plank position.
- Perform a push-up.
- Jump feet back to the squat position.
- Explosively jump up into the air, reaching overhead.
- Land softly and repeat the sequence.
b. Mountain Climbers
Mountain climbers target the core, shoulders, chest, and legs. This dynamic, full-body exercise can significantly improve cardiovascular endurance and agility. It is an excellent functional workout for trekking preparation as it engages both the upper and lower body muscles while strengthening the core muscles.
How to Perform Mountain Climbers Exercises:
- Start in a plank position with hands shoulder-width apart and body in a straight line from head to heels.
- Drive one knee towards the chest, then quickly switch legs, alternating in a running motion.
- Keep the core engaged and the hips stable throughout the movement.
- Continue at a moderate to fast pace for the desired duration.
Incorporating bodyweight exercises into your training routine can help you build strength and endurance and prepare your body for the physical demands of trekking. Consistency and proper form are crucial to maximizing the benefits of these exercises and ensuring a safe and enjoyable trekking experience. Engaging your core muscles, including obliques, abdominals, and lower back, with Russian twists can improve your rotational stability and balance, preventing injuries and enhancing overall performance during trekking.
When incorporating strength training exercises into your workout routine, it’s essential to maintain proper form and technique to avoid injury. Start with lighter weights and gradually increase the intensity as you progress, focusing on compound exercises targeting multiple muscle groups simultaneously. Some examples of practical strength training exercises for trekking include squats, lunges, deadlifts, and pull-ups.
Remember to give your muscles time to recover between workouts, and remember to stretch before and after your workouts to prevent injury and improve flexibility. Combining strength training with jogging and proper stretching allows you to take your fitness to the next level and confidently tackle even the most challenging treks.
Our Trekkers Reviews And Expreinces
Posted onTrustindex verifies that the original source of the review is Google. Trekup india was good , our trek leader dev sir was also good . We had good time with our guide bobby , He made us feel like home and treated us so well . Food was so good . Give a raise to your guide bobby he is so goatedPosted onTrustindex verifies that the original source of the review is Google. The people here are very supportive and good in behaviourPosted onTrustindex verifies that the original source of the review is Google. I did the Sandakphu Phalut trek with them and it was an amazing experience, highly recommended. Special shoutout to the guide Sanjay RaiPosted onTrustindex verifies that the original source of the review is Google. Just completed Sandakphu-phulet trek. Had an amazing experience. Witnessed some of the majestic views and had some of the best hospitality experience. This wouldn't have been possible possible without the guidance and motivation of our guide - Mr Sanjay Da. He was like an elder brother to us. Always very kind, supportive and unmatched hospitable. Had a really great time.Posted onTrustindex verifies that the original source of the review is Google. Had an amazing experience trekking with Trekup India on the Har Ki Dun trek. First of all, I would like to sincerely thank the Operations Manager Mr Nanda Rawat, and the Operations Team Coordinator, Miss Pooja Bhatt, for managing everything so well and making the entire journey smooth, joyful, and truly memorable. From start to finish, the Trekup India operations team did a wonderful job. The planning, coordination, and on-ground support were excellent, and everything felt well organized. The team was always helpful, friendly, and supportive, which made us feel safe and comfortable throughout the trek. The food was very nice and exceeded expectations, especially considering the tough mountain conditions. Every meal was fresh, tasty, and energizing, which played a big role in keeping the trek enjoyable. Trekup India truly focuses on creating experiences, not just treks. Their passion, dedication, and hard work were clearly visible in every aspect of the journey. I am really grateful to the entire operations team and would highly recommend Trekup India to anyone looking for a memorable and well-managed trekking experience.Posted onTrustindex verifies that the original source of the review is Google. I completed Dayara bugyal trek with Trekup india and everything was well planned. Our trek leader, Arpit Rawat and Abhishek were very supportive and helpful.Overall a very good experience with Trekupindia. Thank youPosted onTrustindex verifies that the original source of the review is Google. Very good experience. Nice trek leader. Everything was good, including food and accommodation and the overall service.Posted onTrustindex verifies that the original source of the review is Google. Amazing experience on the Kedarkantha trek with Trekup India. Everything was well-organized and safe. Special thanks to trek leader Sunil Rawat for his excellent leadership and motivation, and guide Layak Singh Rana for his constant support on the trail. A truly memorable trek—highly recommended! ⛰️
We provide only Indian vegetarian food, and your meal will mainly consist of Indian bread, vegetables, lentils, rice, and a delicious dessert. During your trek, we will serve three meals a day, including breakfast, lunch, and dinner. You will also be served tea, snacks, and lip-smacking soup in the evening before dinner. If it is a long day of trekking, you will be given a packed snack.
After extensive research on the trekkers’ nutritional requirements, we prepare the menu. Before putting all the meals together, we also consider the altitude and the weather.
The meal we serve during the trek is perfectly balanced with calories, carbohydrates, vitamins, protein, fibre, and minerals. You need to know that all our cooks have great expertise in cooking and have undergone thorough training. So, get ready to enjoy delectable and lip-smacking dishes during your trek. You will be served with lemon tea in the tent to start your day with a refreshed feeling. Before leaving the campsite for trekking, you will be given a hot finger-licking breakfast like upma, Aallu Prantha, Besan Chilla, Poha, Daliya, Corn flakes, and Maggie, along with tea or coffee.
If your trek is longer, we also offer some fresh local fruits such as apples and healthy drinks like Frootie or Maaza. In the afternoon, you will be served a simple & healthy lunch, while at around 04:00 pm, you will be given tea and a light evening breakfast. After you reach your campsite at night, you will be served a hot and delightful dinner.
After reading this, you must have understood the food we provided on the trek; you don’t need to worry about food. Many trekkers repeatedly trek with us because of the food we provide. Thus, we will give you unforgettable experiences.

Trekking with us for the Bhrigu Lake Trek is entirely safe because we have a team of trek leaders qualified in Wilderness first-aid and complete information about the high-altitude glitches. During the trek, we carry a full first-aid kit that contains all the essential medicines. Before trekking with us, you must ensure that you are medically fit for the trek; for us, your medical fitness is more important than anything else.
Right from our establishment, we at Trekup India have been continuously introducing new safety practices into Indian trekking to ensure the safety of voyagers. Trekup India introduced microspikes and made emergency bottled oxygen mandatory for all treks. Our trek leaders take your daily Pulse oximeter reading. We at Trekup India introduced the radio walkie-talkie as a safety communication device.
How can we ensure that your trek is safe with us?
We have noticed that most trek-organizing organizations do not follow these systems, but with time, they are following us; several competing companies are adopting these practices and organizing great, safe treks.
We ensure complete technical safety in the mountain. Our company has a vast team of more than 100 guides and trek leaders who serve on Himalayan treks. One of the best things about our team is that all the members are trained professionally by the Nehru Institute of Mountaineering, Indian Mountaineering Foundation Delhi, and Hanifle Center Outdoor Education Mussoorie.
Explore our New Safety Protocols
To ensure a perfect Trek, we have introduced some new safety checks to ensure excellent safety for our trekkers.
Our On-trek safety checks include:
- Daily oxygen saturation, along with pulse readings
- Stretchers team appointed on every trek
- Radios
- Trained mountain staff and complete safety
- Additional oxygen cylinders
- Special medical kit for high-altitude treks
- Microspikes on all types of snow treks
- Experienced Trek leaders, as well as safety
- Technical team on all snowy slopes
For Us, Your Safety Is the Top Priority
At Trekup India, you will find a team with local knowledge and fluency in English and Hindi. This helps ensure that you have a fantastic trek. Not only this, but we also pay attention to your health and safety because this is something we cannot ignore. All the team leaders involved in trekking have already undergone several professional courses in first aid, portable altitude chamber training, CPR, environmental awareness training, and advanced wilderness emergency medicine.
We also carry a complete first aid medical kit on every trek and trip we organize. Apart from the medical kit, we take a portable altitude chamber (if needed) and medical oxygen for all high-altitude treks. Our company has significant expertise in organizing all sorts of group adventure holidays for family groups, school and college groups, and friend groups. We have many travel options that suit different fitness levels and travelling styles.
Regardless of the group size, we value each and every member of our trekking groups. Our commitment to personal attention ensures that your needs and safety are always our top priority.
Who we are?
Trekup India has been a stalwart in the Adventure Tourism industry for 30 years. Since our inception, we have been dedicated to providing top-notch treks, voyages, trekking programs, and high-altitude expeditions. Our extensive experience is a testament to our commitment to your adventure and safety.
We organize treks in Uttarakhand, Kashmir, Sikkim, and Himachal while being part of the trekking community; we feature more than 75 documented Himalayan treks. In addition to other outdoor activities, our company also organizes trips for schools, colleges, and families.
Therefore, we maintain the quality of services offered to our valuable customers.
Must Read These Information Of Bhrigu Lake Trek
Why You Should Do Bhrigu Lake Trek
If you’re seeking a thrilling trekking experience in the heart of the Himalayas, look no further than the Bhrigu Lake Trek. This unique adventure offers a moderately easy hike through picturesque meadows, where you’ll encounter wildflowers and wild ponies in the summer. The autumn views of Dhauladhar and Pir Panjal are simply breathtaking, and the lush grasslands provide a vibrant backdrop as you explore.
As you embark upon this journey, you’ll begin with a leisurely walk and cross a vast grassland with areas of wildflowers. These areas are great for camping; you can set up your tents to enjoy the beautiful scenery. The view is lush and green, and the water of Bhrigu Lake changes throughout the year. In winter, it freezes, and during the monsoon, there is a lot of grass around the lake. The view of the lake is impressive, and the Himalayas look stunning from here.
The reflection of the mountains in Bhrigu Lake is one of the most breathtaking sights in the region. The lake is between two mountain ranges, and it remains frozen and cold in winter. However, during the monsoon season, it transforms into a stunning blue and is covered with lush green grass. The water of Bhrigu Lake is one of the clearest in the country, and it is a fantastic sight to behold.
Embark on a trek that’s as challenging as it is rewarding. The path leading to Bhrigu Lake is a mix of easy to moderate terrain, with a few patches of strenuous climbing to keep you on your toes. The trek to the lake typically takes around 3-4 hours, offering ample opportunities to soak in the stunning views of the Solang Valley in Himachal Pradesh. The lake, named after the Hindu saint Maharishi Bhrigu, who meditated on its banks, is a popular spot for trekkers, thanks to its spectacular views of the surrounding mountains.
You’ll be mesmerized by the stunning views of the Himalayas, lush green meadows, and crystal-clear water of the Bhrigu Lake. The lake’s colour changes according to the season, turning green in summer, deep blue towards the end of summer, and white in winter. The best time to visit the lake is during the summer months of July and August. So, pack your bags and prepare for an unforgettable adventure in the lap of nature!
Best time to do Bhrigu Lake Trek
Bhrigu Lake is a stunning high-altitude trek nestled in the Himalayas that attracts adventure enthusiasts worldwide. The trek is located at 14,100 feet and can be pursued for approximately four months each year. If you’re planning a trip to Bhrigu Lake, choosing the right time of the year is essential to ensure that you make the most of your experience.
The best time to embark on the Bhrigu Lake trek is from June to September, possibly extending until the end of October. During this period, the weather is pleasant and ideal for trekking, with clear skies and warm temperatures. You’ll witness breathtaking views of the surrounding mountains, lush green meadows, and stunning alpine forests.
However, you may plan to visit Bhrigu Lake in May. In that case, you should be prepared for heavy snow, making the trek challenging. Climbing up to Bhrigu Lake during May can be risky due to the precarious terrain, and the snow can make it difficult to access the area.
Therefore, it is highly recommended that you plan your trek to Bhrigu Lake between June and September when the weather is favourable and the trail is accessible. During these months, you can enjoy a safe and memorable trekking experience, making it an ideal time to explore the natural beauty of Bhrigu Lake.
How Difficult is the Bhrigu Lake Trek
Are you ready for a thrilling trekking adventure? The Bhrigu Lake trek is a moderate-level trek that promises to challenge and inspire you at every step. The journey begins in Manali, situated at an altitude of 6,725 ft, and ends at an impressive height of 14,009 ft over four days. With each passing day, you’ll witness breathtaking vistas of snow-capped peaks, lush green meadows, and pristine lakes that will leave you spellbound. However, be warned – the trek is not for the faint-hearted! The trail to the lake is characterized by a consistent upward slope, which becomes steeper towards the final ascent. It’s recommended for physically fit trekkers who are embarking on their first trekking adventure. So, are you ready to conquer the Bhrigu Lake trek and create memories that will last a lifetime?
Mythological Stories About Bhrigu Lake Trek
On the tranquil shores of the Bhrigu Lake, the revered sage of ancient India, Maharishi Bhrigu, sat in deep contemplation. He was not just a sage, but a prominent member of the esteemed group of seven sages, renowned for their exceptional wisdom and spiritual prowess. The lake’s location, nestled between two towering ridges at a high altitude, provides the perfect setting for peaceful contemplation and introspection. The serene atmosphere of the lake, coupled with the majestic Himalayan mountain ranges surrounding it, make it a place of unparalleled beauty and tranquillity.
From where Maharishi Bhrigu sat, one can get a splendid view of the Pir Pinjal and Dhauladhar ranges, with their snow-capped peaks like Indrasen, Deo Tibba, and Hanuman Tibba, standing tall and commanding attention. The view of these majestic mountains, their peaks piercing the sky, is truly breathtaking. It is no wonder that many spiritual seekers and nature enthusiasts flock to this place for inspiration and rejuvenation.
The locals consider the lake sacred due to the spiritual reflections of Maharishi Bhrigu, who is believed to have cleansed the lake and its surroundings. His spiritual energy is believed to still linger in the area, making it a potent place for meditation and self-discovery. To maintain the sanctity of the place, camping near the lake is not allowed. Visitors can only spend a limited time near the lake, soaking in its serene beauty and connecting with the divine presence that permeates the area. It’s important to note that the local authorities strictly enforce these rules, and visitors are expected to respect them.
Frequently Asked Questions About Bhrigu Lake Trek
What amenities can you expect on the Bhrigu Lake trek in terms of internet and power?
While trekking to Bhrigu Lake, it’s important to note that beyond Manali, there is a scarcity of electricity and unreliable cellular connectivity. However, at the Rola Kholi campsite, you can expect a signal from Vodafone and Jio, and occasionally Airtel is available about 100 meters away. It’s important to note that network reliability can be impacted by weather conditions, particularly cloudy skies.


